Linda Ellenwood Lesson I
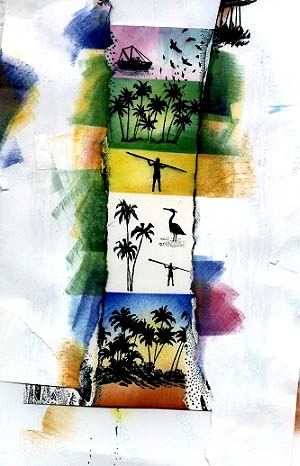
Palm Island Grid
NOTE: All images are stamped with a Marvy black stamp pad. All coloring is done with Marvy stamp pads that are not real juicy. The dryer the better. I hold the pad at an angle and drag it from the mask to the picture.
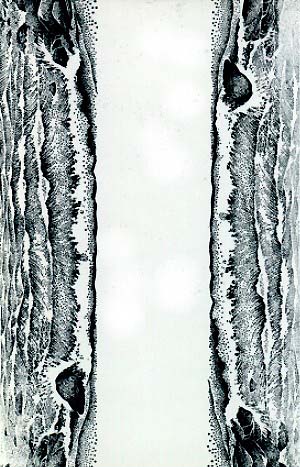
Stamp the "Seaside Cove" #139H using Marvy black ink. Stamp one image on each side. Heat set the ink carefully with your heat gun.
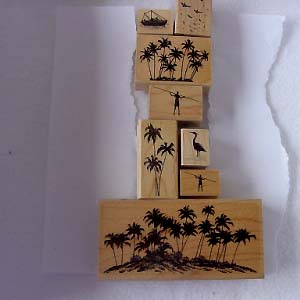
Lay out your stamps on your paper before you start stamping. It helps to arrange them. You want the stamps close but they don't have to touch. This will give you enough area around the stamp for the grid. Move the stamps off of the paper and place in order on your table.
The stamps I used are from top to bottom Fishing boat #164A, Flock#113B, Palm Cluster #100D, Spear fisherman 109B, Palm Trio #125C, Crane in Water #163A, Spear fisherman 109A, Palm Island #120F.
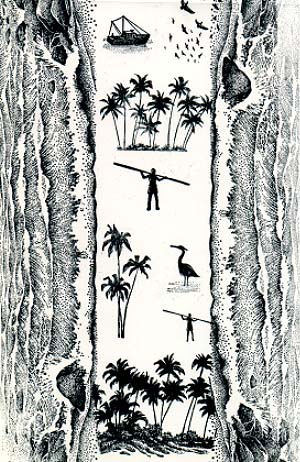
Stamp all images with black Marvy Ink and heat set. Carefully heat it with your heat gun. This will keep it from smearing in the next step.
Let your paper has cool. I use a small piece of double stick tape on the back and stick my picture to a piece of scrap paper that is larger than my picture. Then I can turn it around to make it easy to drag my stamp pad in a comfortable position.
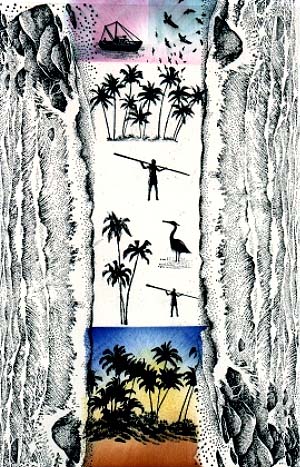
Mask the Seaside cove images and put a mask around the fishing boat section. Hold your #57Rose Pink stamp pad so that an edge comes in contact with the masking paper and lightly drag onto the picture. It's important that you start off of the picture and drag onto it. Use a light touch if your stamp pads are wet. Repeat with 64 Plum. Go all around the boat to form the first section. Then go to the bottom and do the Palm Island section do the same procedure with #6 brown for the ground, #43 Brilliant Yellow, #29 Prussian Blue for the sky.
I went from the top picture to the bottom picture to give the ink a chance to dry. It helps if you tape your masks to each other so they don't slip. Use a temporary tape so you can move them around. Make sure you don't tape you mask to the picture. Tape it to your scrap paper or other masks. Post Its will not work for this. They hurt the glossy finish.
Just continue this process until you've finished all of the sections. You will have to move masks around as you go. Bird section at top #60 Salvia Blue. Palm Cluster section #72 Pine Green and #5Yellow Large spear fisherman section #13 Ochre and #5 Yellow and #43 Brilliant Yellow.
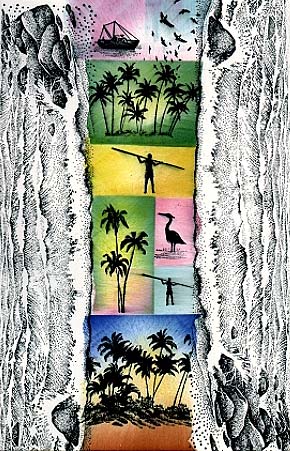
Palm Trio section #72 Pine Green and #5 Yellow and #57 Rose Pink, Crane section #57 Rose Pink,Small Spear Fisherman #60 Salvia Blue.
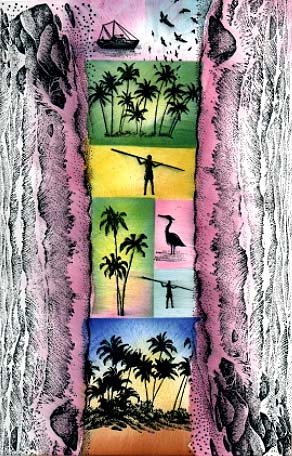
After the grid was finished, remove all the masks and let dry a few minutes. Loosely mask the inside of the picture so you can do the Wave frame. Torn paper towel will work fine. Start with your lighter colors and go around the inner and outer edges. Drag your stamp pads off the paper and onto the picture the same way you did the grid sections.
Switch colors often so your frame has some variety and interest. The more ink you get layered on the paper the better it will look.
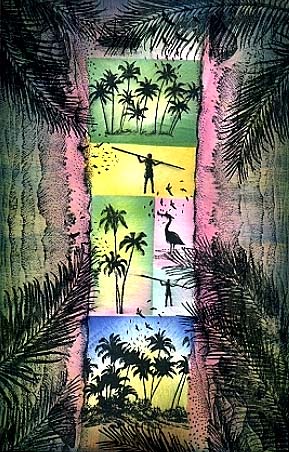
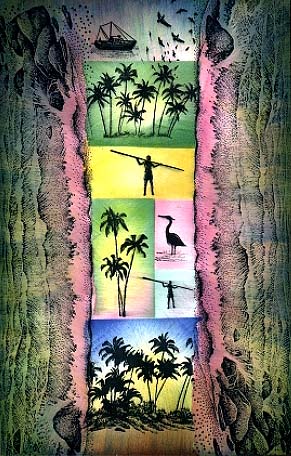
Finish your picture by adding some #124F Palm Frond-Large and some small birds #112A Flock. These will give a little more movement to the picture.
I hope you have fun doing this. I'd love to hear from you, Linda Ellenwood.