Cut an 8.5 x 11 sheet of gloss white cardstock (CS) in 4 - cut 11" length to 5" then cut each 5" x 8" to 5" x 4".
This is a perfect size to save on gloss CS and to make a 5" x 7" standard size card.

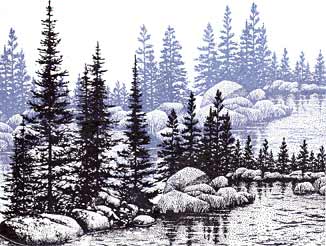
1. Ink the Pine and Rocks with black ink (Preferrably waterproof ink like Memories). Ink the stamp - DON'T stamp the ink so you can see if you're getting ink on the entire image and to make sure it's not 'pooling' if it's new or you just re-inked the pad. IF that's the case, STAMP OFF or even 'blot' with paper towels. Sidenote: A good paper towel (I use the ones from COSTCO) is the greatest blotter and masker I've ever found.

2. Wrap the paper towel around your finger and 'blot' the edges of the water at the bottom and sideof the stamp. Locate the stamp on the
left side of your CS. What you are looking at on the stamp is what is going on the paper. If you're concerned you're not locating properly -
don't be. Stampscapes are the greatest to work with because they are designed to stamp over other images. SEE FIGURE 1
Sidenote: If you are ever wondering which is up or down on the stamp the Stampscapes name is always to your left. That way your ducks and geese will
always be flying upright and all your other images will be upright also.
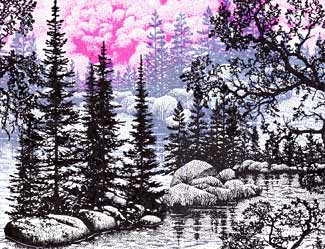
3. Ink the Lakeside Cove with black ink. 'Blot' the edges of the water and rocks. ALWAYS BE SURE TO BLOT AND NOT TO RUB!!!!! Locate and stamp the image as in FIGURE 2. Remember, these stamps are designed to stamp over the other images. If you don't go far enough to the left of the LSCove stamp you will end up with a void between the two images. Sidenote: If you are ever in doubt that the ink is dry on the card before stamping another image ALWAYS HEATSET. Sidenote 2: Cut a HEAVY piece of cardboard (like the back of a steno pad of paper) and cover both sides with heavy duty foil. ANY time you have to heat set or emboss just place your paper onto the foil cardboard and the paper will NOT warp on you. You'll note that it starts to move around but settles down flat. Sidenote 3: When stamping with a lighter color it is NOT NECESSARY TO MASK.
4. Wash the Lakeside Cove stamp and ink with Marvy Salvia Blue. BLOT! Locate and stamp as shown in FIGURE 3. YOU SHOULD NOTE THE TALLEST PINE IS LOCATED TO THE RIGHT OF THE TALLER PINES OF THE LAKESIDE COVE IMAGE ON THE LEFT SIDE. Re-ink, BLOT and stamp the second image a little higher REMEMBERING TO POSITION FAR ENOUGH OVER THE EXISTING IMAGE SO YOU DON'T LEAVE A VOID.
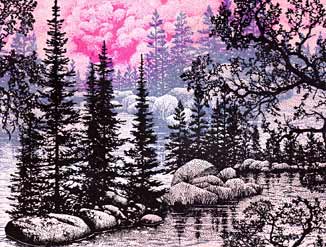
5. Ink the Cumulous cloud image with Marvy Rose Marie. BLOT EVEN MORE OF THE EDGES OF THIS IMAGE ENSURING YOU DON'T BLOT THE MAIN CUMULOUS IMAGE. Position over the left Blue Salvia image as in FIGURE 4 AND WITHOUT RE-INKING turn the image to between 10 and 11 o'clock and stamp the area right of the Cumulous and turn the image to between 1 and 2 o'clock and stamp the area to the left of the Cumulus.
Sidenote: When stamping with a lighter color it is NOT NECESSARY TO MASK
6. Ink the Oak Branch with black ink. This is one of the most versatile stamps to use and I also call it my 'eraser' as it covers a lot of sins. Stamp the image in three places as in FIGURE 4. DO NOT BE AFRAID TO COME OVER ONTO THE CS, JUST TRY NOT TO STAMP OVER the pine trees. It's still OK if you do. Ink the Water Pattern Sm. With Marvy Salvia Blue - STAMP OFF 2X - and without re-inking lightly stamp the water areas of the Blue images especially if there are any all white areas. Without washing it re-ink it with black ink - STAMP OFF 2X - stamp the black area of the water just to keep continuity.
Sidenote: If you have not already done so, go to the Stampscapes site and look up the lesson on the use of the Tonal Applicator. There is no sense repeating all that here.
7. Using the Tonal Applicator (TA) apply Seashells Pink over the entire CS. See FIGURE 5.
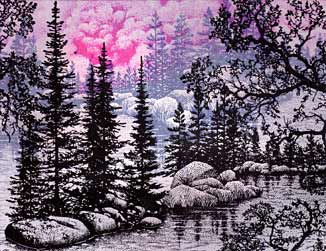
8. Using the TA now apply Seashells Cloudy Blue over all but the Cumulous itself and the water and rocks below it as this will be the light entry onto the card. See FIGURE 6.
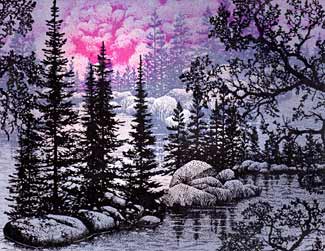
9. Using the TA now apply Marvy Salvia Blue, see FIGURE 7. Sidenote: BE SURE TO LEAVE THE FEATURE AREA BRIGHT AND NOT APPLY ANYTHING OTHER THAN THE SEASHELLS PINK IN THAT AREA.
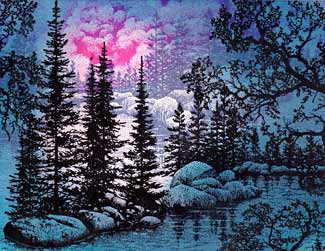
10. Using the TA now apply Marvy Carribean Blue see FIGURE 8
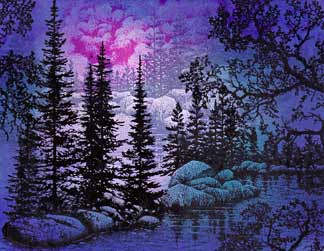
11. Using the TA now apply Marvy Pale Violet
Finis. Congratulations.
Ken Pesho/delkenpesho@aol.com
Lesson by Ken Pesho, AZ 2006