#049G is larger than the ATC Bord so with this stamp, as with many others, you would simply ink up your stamp - please DO NOT STAMP YOUR INK -by laying the stamp on the table, rubber side up, and applying the ink to the stamp. This way you can see if you have inked the entire stamp and, also, if the ink is too wet or too dry. Too wet, you will see 'puddles' of ink on the stamp and too dry is like you almost didn't ink it at all.
Leave the stamp, rubber side up, and take your ATC Bord and position it on the Stamp so the tops of the trees are just below the top of the Bord. Press down or hold it on and turn over the stamp and Bord and press on the stamp as you normally do. NOTE: WHEN REMOVING THE BORD YOU MUST HOLD THE STAMP AS YOU REMOVE THE BORD AS IT DOES STICK TO THE STAMP. If you don't you will inevitably drop it and get multiple images on your Bord. If you do, take a paper towel and wipe off the wet ink, lay the Bord on the table and take 0000 Steel Wool and rub the surface to remove the image and start over. I elect to use a square foam fingernail file - 4 sided - and in one direction rub the image off. The Bord is as smooth as new and remains perfectly flat because of even pressure. Then start over.
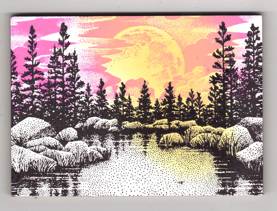
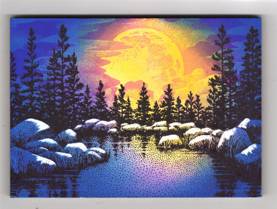
Your Bord should look like this:

Next take the Cloud Rising Moon, lay it on the table, rubber up, and ink the stamp with #59 Rose Marie. Take a paper towel, wrap it around your index finger and blot the edges of the stamp. Stampscapes can be stamped right over another image when you are using a lighter color for the second, third, etc stamping. Position the moon above the shorter pines, ensuring the stamp is going OVER the smaller pines so the clouds are between the pines when finished.
HEATSET BLACK BEFORE APPLYING OTHER COLORS AND ESPECIALLY BEFORE APPLYING WITH A CLEARSNAP!!!!!!

Reink the stamp with Rose Marie, blot with the paper towel around the edges and position with a slight overlap of the existing clouds and stamp the image. Don't concern yourself with cloud lines not lining up as you'll never know it.

NOTE: The blotting has prevented a distinct ridgeline between the two stamped clouds making the scene flow smoothly.
If you look at your scene you'll see the cloud is coming up through the clouds and right - from the clouds. So the light direction, in my mind, is going to the right. I applied Sea Shells Conch Shell with a Clearsnap having more yellow to the right of the moon than to the left and coming across the rocks and water on an angle to the right. If you see if differently in YOUR MIND'S EYE then, by all means, put it in the direction you see.
With a Clearsnap, apply Sea Shells Seashell Pink on the rest of the Bord. NOTE: If you do not have Sea Shells then just use any yellow for the moon and beams and Rose Marie without the Sea Shells Pink. The reason I use Sea Shells is because, I AM ASSUMING, it has Glycerin or more glycerin than regular inks or something that makes the rest of your inks flow nicely. So after applying Seashell Pink LIGHTLY apply Rose Marie everywhere but on the yellow.
YOU DEFINITELY CAN GO INTO THE YELLOW WHEN APPLYING THE PINK JUST DON'T GO TOO FAR INTO IT.
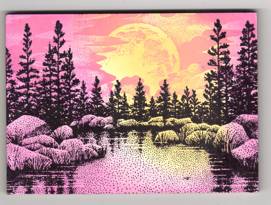
Apply Salvia Blue with a Clearsnap over ALMOST all of the pink. On a Bord, just like a card, you always want to leave a little of the previous color showing.

Apply Lt. Blue, with a Clearsnap, over the Salvia Blue again leaving a little of the previous color showing.
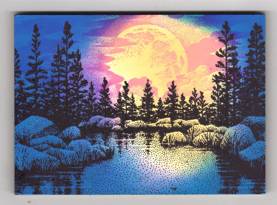
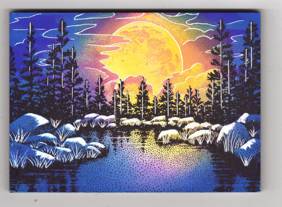
Now apply Marvy Yellow over the moon , clouds and rays area without being overly heavy with the application. Tend to stay IN from the edges of the rays so you don't turn everything else green. Then lightly apply Orchid around the outside of the rays where you still see pink. And apply Marvy Blue over all the remaining Lt. Blue you see on the Bord.
HEATSET THE BORD AS WE ARE PREPARING TO START SCRATCHING AND YOU DON'T WANT TO BE RUBBING THE HEEL OF YOUR HAND ACROSS THE BORD SMEARING YOUR CREATION.
When using the #113 'Shovel' you don't use the tip. Turn it slightly so you have a broader cutting area and use the tip to the right on an angle. Using your holder with #113 'Shovel' you need to scratch the tops of the rocks paying attention to how the moonbeams are hitting them.
Start in the middle as the beams are coming directly onto the rocks and follow the shape of the rock. Go deep enough to feel the scratchline. This is going to be your guideline. Then work the rocks to the right or left NOT DOING THE ENTIRE TOP OF THE ROCK AS THE LIGHT IS HITTING IT FROM THE RIGHT OR LEFT ONLY. See next picture.

Now you need to get the light onto the rocks. Still using the shovel, place the angled tip onto your ridgeline and pull in a downward motion and kind of lifting at the end of the pull to give a soft, kind of pointed line rather than a squared off end to the ray of light. Do this on each rock and make it uneven as in the picture below and angled on the right and left rocks as the rays hit them.
NOTE: IF YOU GO TOO FAR ABOVE YOUR RIDGELINE OR 'NICK' IT ABOVE THE RIDGELINE JUST MAKE THE RIDGELINE TALLER, who's going to know the rock wasn't that big to begin with. STAMPBORD is very forgiving.
Now you're going to go to knife #112 'Spear'.
NOTE: When changing tips DO NOT GRAB THE KNIFE AND PULL STRAIGHT OUT. GOOD WAY TO CUT YOUR FINGERS. Take a paper towel or a cloth or your shirt and grab the knife, twist to release and pull out easily. Insert the next tip and twist to lock into place. As you're pushing on the knife doing the scratching it sometimes tends to really lock itself into place. That's why it's a good idea to get into the above habit.
Turn your Bord upside down on your table and with your 'Spear' outline the clouds where Kevin so graciously has left you the pattern. Outline the moon.
Don't cut the tops of any of the trees that might be into the moon - outline around them. Then take a metal ruler, or a straightedge of any kind, and trace the pinetree trunks. Note in the picture below that you don't cut the line into the entire trunk. Gap between them so you don't just create a 'ROW OF SOLDIERS AT ATTENTION'.
Finally the reeds around and on the rocks. I don't know what it's like where you live but, HERE, the tips of the reeds are pointed. This is why you are doing them upside down - so the bottom starts square and the top ends up pointed. Also, DO NOT MAKE THEM STRAIGHT UP AND DOWN. Follow Kevin's pattern of the reeds - straight, curving to the right and then curving to the left, etc., etc., etc.
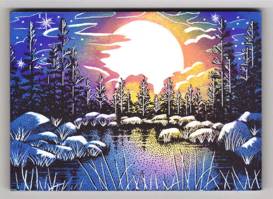
Still using the 'Spear' you need to accent the pines. Note the pines directly under the moon have the branches highlighted on both sides - but not every branch. The lower branches are shaded from the moonbeams by the upper branches. As you work to the right and left you only need to do one side and not all the branches as the moonbeams get blocked by the other trees.
Straight line branch and then a couple of little flicks on angles to create the needles. Switching back to the 'Shovel' broaden the outline on a couple of the clouds - I did 6 of them. And scratch out the moon then smooth with fiber tool staying away from the edges.

Ink your Reeds stamp with Memories Black and stamp reeds in the foreground. HEATSET THEM. Even after heatsetting you'll find when you scratch them the clay is going to seem very soft to you. No problem just don't go too deep or just heatset again and continue scratching.
When you stamp the reed twist the stamp to the right or left or right and raise them up or down so you keep the 'SOLDIERS' away.
TURN YOUR BORD UPSIDE DOWN WHEN DOING THE REEDS. YOU NEED THE POINT AT THE TOP! Now make some stars. With the 'Shovel' - hold the pen upright, point of the 'Shovel' on the Bord, thumb and forefinger on the pen thin end and lightly spin. You don't put any pressure on it, just spin it. If you apply pressure or spin too much it could go all the way to the Bord. If it does - don't panic. Get a bottle of White Out at your nearest WalMart, Target or stationary store and a box of round toothpicks. Dip the tip of the toothpick into the whiteout and apply to the area that is brown because you went too deep and Voila! Repaired.
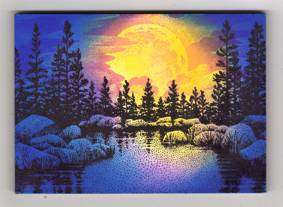
If you choose to seal your Bord use a clear acrylic spray of your choice or liking. This is what it looks liked sealed.
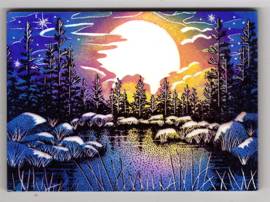
Stampbord is very forgiving. It's a fabulous surface to work with. It's really FUN! It's relaxing. But most importantly it allows you to create beautiful ARTWORK. Go for it! -Ken Pesho