Diamond Mosaic
NOTE: Please read through the Masking and Basic Stipple Brush Technique instructions prior to reading the lesson.
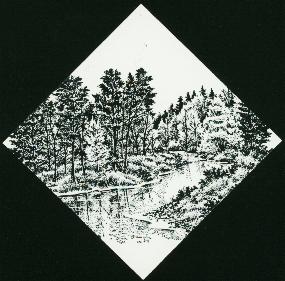
Cut a 3 x 3 inch square of Beckett Expressions matte white cardstock. Turn the square so that it looks like a diamond and stamp Autumn Brook 212G with Ranger Archival Jet Black.
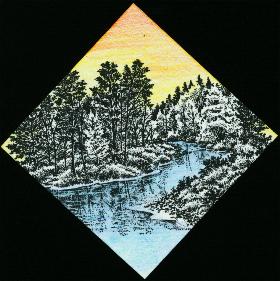
Begin coloring your scene using colored pencils. In order to create a nice contrast between the sky and water, an early morning sky is created using yellow, orange and red pencils. First, using light pressure with the pencil, color the entire sky area with light yellow, then use an orange pencil to darker the upper sky a bit, being sure to leave some of the light yellow along the tops of the trees. Using a red pencil, color over a small portion of the upper sky to darken it. This graduation of color helps to add a nice sense of depth in the sky.
The stream is colored first with a light blue, then olive green, and then finally the light blue again, layering one color on top of the other. To give the water area a more fluid appearance, a colorless blender pencil was used over the water area to smooth and blend all the colors.
Color the ground area by layering first brown, followed by light green. Be sure to color the sand areas along the bank with brown only.
Use light green, orange and red to color the oak type trees for a fall foliage appearance. Use medium and dark green pencils for the evergreen type trees. Go back over the oak type trees with a light yellow pencil and moderate pressure to blend and smooth the colors of the leaves.
Using a Krylon Silver Leafing Pen, edge all four sides of the diamond with silver. This diamond is now finished.
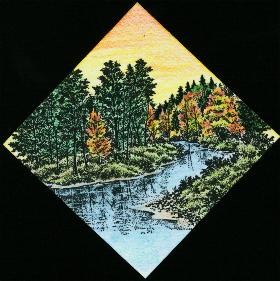
Cut a 4.25 x 5.50 inch piece of black matte cardstock, this will be your base cardstock. Migrating Birds Large 151E is stamped across the top of the cardstock with a Blanco White Dye inkpad. Reeds Large 068D is stamped with a Blanco White Dye inkpad across the bottom. Edge all four sides of the base cardstock piece with a Silver Krylon Leafing Pen. Center the diamond piece on the base cardstock and affix with double sided tape.
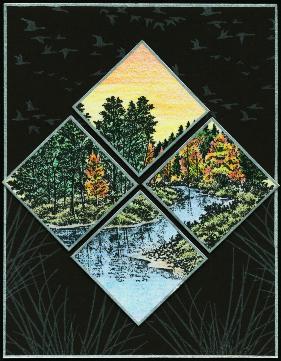
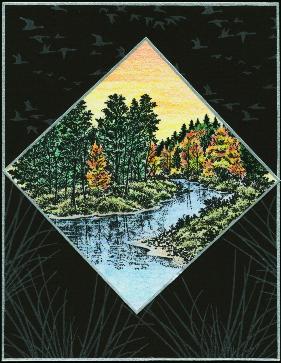
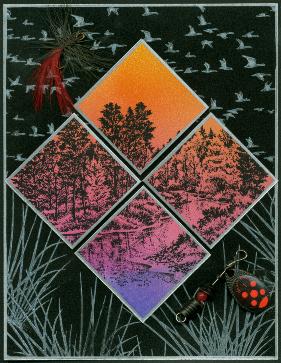
To change the perspective a bit, let's modify the composition of the card. Take the diamond and cut it into four equal parts, cutting from one SIDE to the other SIDE (NOT from point to point). Edge all four sides of each piece with a Krylon Silver Leafing Pen. Affix the diamond shaped pieces (keeping them in order) with foam mounting tape to the front of the base cardstock. You now have a mosaic look.
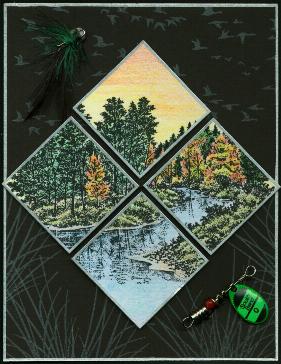
While I do like the look of this card, I still felt it was a bit bland, missing that special "something" that would make the entire piece click together. When I look at the card, I think of fishing, so the perfect embellishment for this piece must be something related to fishing. I rummaged through my husband's tackle box and found a pretty, feathery, small fishing lure. I disassembled the fishing lure, removing the fly hook piece from the spinner piece, and glued both pieces at opposing corners of the card. That did the trick and I think this would be a perfect card for any man!!

Now for a small "Quick Card" alternative for this project. Cut a 3 x 3 inch square from Glossy White Cardstock. Turn the square so that it is a diamond and stamp the 212G Autumn Brook with Ranger Archival Jet Black ink on the diamond shape. Let dry. Brayer the entire square with a rainbow dye inkpad (I used Ranger Big & Juicy Rainbow pad, Beach Umbrella). Let Dry. Using a Krylon Silver Leafing pen, edge all four sides with silver.
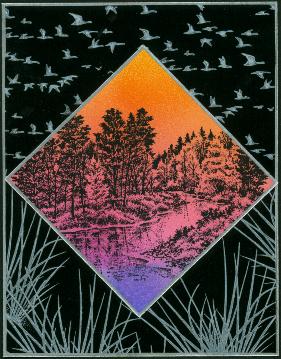
Cut a 4.25 x 5.50 inch piece of black glossy cardstock, this is your base cardstock. Migrating Birds 151E is stamped with a Blanco White Dye inkpad on the top of the base cardstock. Reeds 068D is stamped with a Blanco White Dye inkpad at the bottom of the base cardstock. Using a Krylon Silver Leafing pen, edge all four sides of the base cardstock with silver. Let dry and spray with a spray sealant. Center the brayered diamond piece on the base cardstock and affix with double sided tape. This card is now finished "as is".
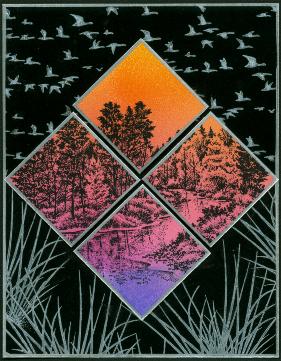
To change the perspective a bit, let's modify the composition of the card. Take the diamond and cut it into four equal parts, cutting from one SIDE to the other SIDE (NOT from point to point). Edge all four sides of each piece with a Krylon Silver Leafing Pen. Affix the diamond shaped pieces (keeping them in order) with foam mounting tape to the front of the base cardstock. You now have a mosaic look.
While I do like the look of this card, I still felt it was a bit bland, missing that special "something" that would make the entire piece click together. When I look at the card, I think of fishing, so the perfect embellishment for this piece must be something related to fishing. I rummaged through my husband's tackle box and found a pretty, feathery, small fishing lure. I disassembled the fishing lure, removing the fly hook piece from the spinner piece, and glued both pieces at opposing corners of the card.
"Diamond Mosaic" by Tyra Smith April 2001
Finished Size: 4.25" x 5.50" inches
Images: Stampscapes®: 212G Autumn Brook, 151E Migrating Birds Large, 068D Reeds Large
Materials: King James Cast Cote glossy cardstock, Beckett Expressions matte cardstock, black glossy cardstock, black matte cardstock, Ranger Archival Jet Black inkpad, Blanco White Dye Inkpad, Krylon Silver Leafing Pen, scissors, fishing lures, foam mounting tape, spray sealant.
Colour: Ranger Big & Juicy Rainbow Dye Inkpad: Beach Umbrella, Berol Prismacolor Colored Pencils