Oceanside CrystalScapes
NOTE: Please read through the Masking and Basic Stipple Brush Technique instructions prior to reading the lesson.
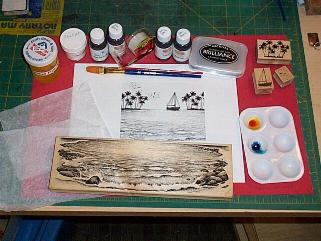
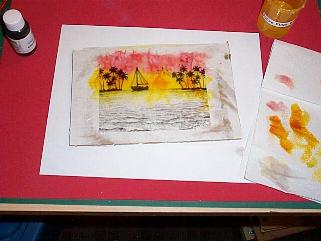
Gather all your supplies together. Cut heat resistant transparency to 4.25 x 5.50 inches.
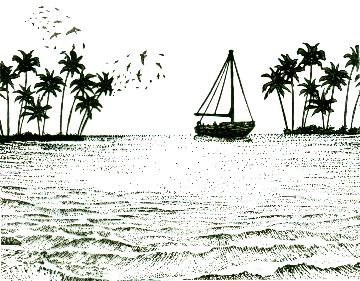
Stamp ocean scene on transparency using a Brilliance Graphite Black inkpad. Let dry, heat set with heat gun. Be sure to hold the heat gun about 6-8 inches above the transparency so you don't accidentally melt it. The side you stamped on will be the FRONT of the piece. We will work on the back.
Using regular scotch tape, tape down all four sides of the stamped transparency, back side facing you, to a stiff surface. (I used a piece of stiff cardboard. The tape will keep the inks and floor wax from spreading underneath the transparency) Using a soft flat brush, spread Future Floor Wax (yeah that stuff that's been sitting in the kitchen unused for months!!) liberally over the surface of the transparency. Lightly sprinkle ultra fine glitter on the top of the wet floor wax and gently heat to dry using your heat gun. Be sure to hold the heat gun approximately 6-8 inches above your transparency so you don't accidentally melt it.
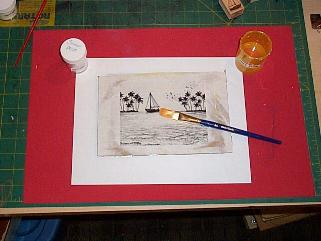
Liberally spread more floor wax over the glittered piece again, lay a piece of uncoated white tissue paper on top and use more floor wax to smooth it over the glittered transparency. Gently brush out any air bubbles that may occur. Make sure there is a liberal layer of floor wax on the tissue paper and then add drops of dye ink in the sky area. I used the reinkers for Ranger Sea Shell Seashell Pink and Ranger Sea Brights Beach Ball Yellow. If you want a more textured look, crumple up and smooth out the white tissue paper prior to laying it on the transparency.
Using your soft wide brush, brush the dye inks over the sky area as desired, blending the pink and yellow where they meet. Apply more dye ink if needed. Wipe ink laden brush on paper towel to remove excess ink as needed and when going from working with the yellow to the pink, rinse brush in water first. Lightly dab a paper towel over an yellow which seeps onto the water area to remove some of the yellow. If some yellow remains, do not worry as the sun would naturally reflect a bit on the surface of the water. Heat to dry.

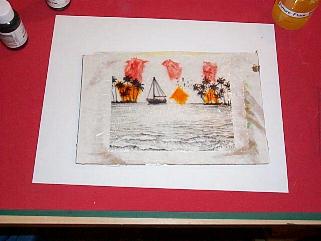
Liberally brush more floor wax on the water area of the scene. Apply drops of Ranger Sea Shells Ocean Aqua and Cloudy Blue to the water area. Using your brush, blend the blues in a desirable fashion. Use a paper towel to lift off any excess ink. Heat set to dry. Put a small dab of the Sea Shells Cloudy Blue ink on a palette and use a small round paintbrush to "paint" the ink over areas in the water that you feel would be darker. Add in some shadows!!! You can also use the floor wax if the ink doesn't move as well as you would like. Heat set to dry.
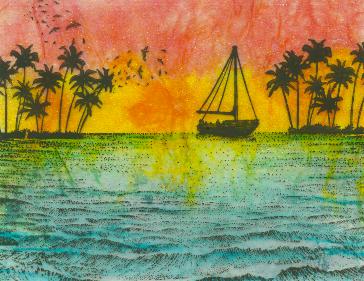
To add a final "glimmery" touch, brush the floor wax over the sky area and add more glitter. This will make the sky more "glittery" and also pick up the subtle glitter of the ocean. Heat set to dry. If you need to apply more ink and/or floor wax for deeper hues, you can do so at this time. Heat set to dry. Apply one final coat of floor wax over the entire piece. Heat set to dry.
Once the piece is dry to the touch, gently remove it from the cardboard and trim edges. Be sure to remove any remaining scotch tape from the front.
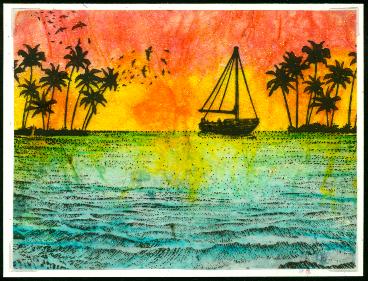
When mounting this to a card front, a lighter cardstock will really bring out the beauty of this piece. The finished transparency is cut down to 4 x 5.25 inches so it will fit snugly on the top of a standard size (4.25 x 5.50 inch) card front. I have affixed the transparency to the card front using clear self adhesive photo corners. You could also use black or gold self adhesive photo corners for a unique look.
There are a million and one ways to modify this technique and create various other projects. Bookmarks are extremely beautiful, as as doorknob hangers, window decorations, holiday ornaments, etc. Once you are comfortable with this technique on a transparency, give some thought to trying it on a piece of glass. You can create a phenomenal stained glass framed piece using this technique.
"Oceanside CrystalScapes" by Tyra Smith 2001
Finished Size: 4.25" x 5.50" inches