Tyra Smith Lesson I
Nature's Magnifigance
NOTE 1: Please read through the Basic Stipple Brush Technique instructions prior to reading the lesson.
NOTE 2: All inks used for stippling and stamping are dye inks unless otherwise noted. Brand is not as important as color, so brand names have been left out.
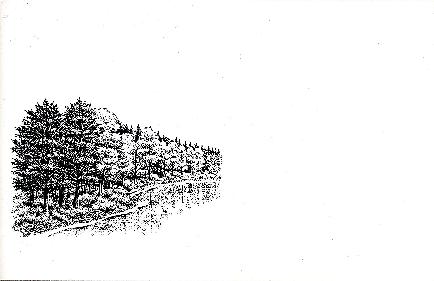
Autumn Bank Left 213G was stamped with black dye ink.
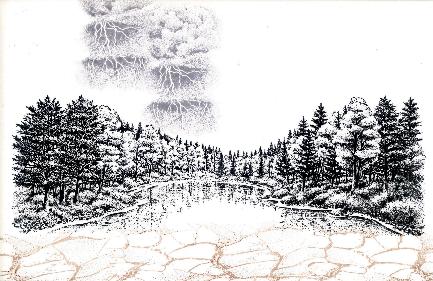
Autumn Bank Right 214G was stamped with black dye ink, slightly overlapping the small trees of Autumn Bank Left 213G. Cloud w/Lightning 020E was stamped twice with gray dye ink, removing excess ink with a paper towel prior to stamping it on the card stock. Cracked Earth 181G was stamped with brown dye ink along the bottom of the card stock in the water area. Ink up the stamp, stamp it on scrap paper, then stamp it on your card stock without re-inking the stamp. This will give you a much lighter stamped impression.

Cloud (Cumulus) 018E was repeatedly stamped with gray dye ink, removing outer "dots" prior to stamping on the card stock. This creates your cloud bank. You may have to use a soft mask (piece of paper towel) to cover any areas you do not want to stamp. Complete the landmass area by stamping the sides of Autumn Bank Left 213G and Autumn Bank Right 214G with black dye ink to the sides of the card stock to "flesh out" the landmass.
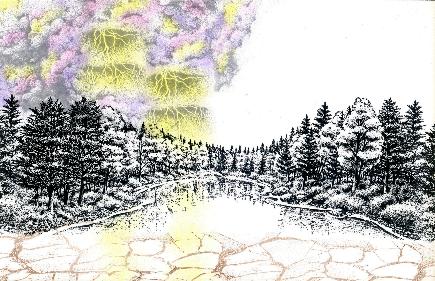
Stipple yellow over the "lightning bolt area", into the cloud bank a bit, and as a reflection in the water. Next stipple light pink and lavender into the cloud bank.
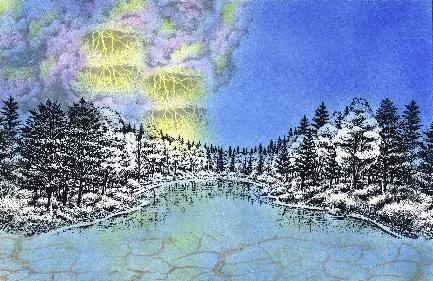
Begin stippling light blue over the entire sky area, stippling into the cloud bank and also over the tops of the trees. It will not matter if you get blue on your tree tops because this will give you natural shading. Next stipple medium blue over the top of the light blue, also into the cloud bank. Next stipple dark blue into the sky area and cloud bank. If you feel the sky is "splotchy" looking, stipple the light blue into it again, followed by the medium blue. This will not really darken your sky, only fill it in and blend the colors. There is a large area of sky and a large area of water which are both blue. In order to have more visual interest (so the scene doesn't become boring with so much "blue"), we need to make the water a different hue of blue. Stipple a very light coverage of light green (I like to use olive green) in the water area. Don't go for a full coverage of green, only a "smattering" of green here and there. Next stipple a good coverage of the light blue, followed by a layer of medium blue. You colors will blend and the blue of the water will be different from the blue of the sky. If you find you have lost the "yellow" of the reflected lightning bolts, stipple more yellow in the area of the reflection at this time.
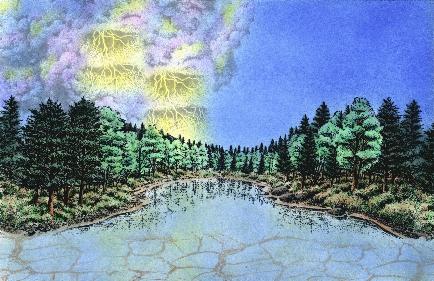
Stipple brown over the ground cover area beneath the trees and down along the sand of the shoreline. It is not necessary to have a full and even coverage of brown. Stipple light green over the top of the brown on the ground cover. Using a very small white bristled brush that is VERY LIGHTLY damp, brush over the brown shoreline area to "smooth out" the appearance of the sand. Using that same brush, apply medium green in the darker areas of the ground cover (indicated by the initial stamped image) to bring out the shape of the ground. Stipple light green in the oak trees. Use medium green and a small brush to "shade" the oak trees as indicated by the initial stamped image. Stipple dark green over the pine trees. With a small brush, smooth gray over the rocks and pebbles along the shoreline.
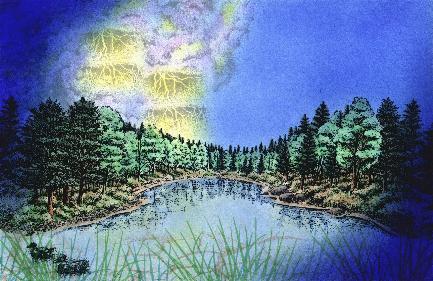
Ducks in Water Large 026B is stamped with black in the lower left hand corner, making sure to remove ink from outer dotted edges of stamp prior to stamping.Reeds Large 068D is stamped alternately with light and medium green along the bottom of the card stock. With a small brush, lightly brush light blue over the tree reflections in the water. Stipple medium and dark blues in the upper left corner and lower right corners. This will create a directional cue for the viewer which will lead their eye in a diagonal path across the entirety of the scene. By giving the viewer directional cues, they will be sure to see the entire scene without getting stuck on any one piece within the scene itself.
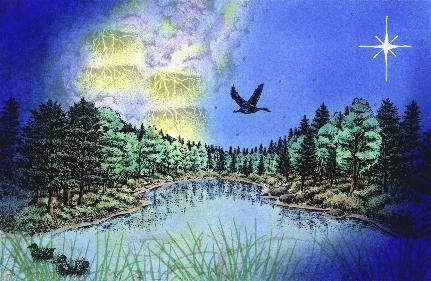
To complete the dimensional cue and finish the piece, use a white opaque pen (I used a Pentel Milky Gel Pen/white) and draw a star in the upper right hand corner. The Solo Duck 162A is stamped in black midway between the hand drawn star and the Ducks in Water Large 026B. To add some extra dimension to the sky, tiny dots were added with a Pentel Metallic Pen/Silver. It does not scan well, but looks very nice in person. Sort of like "far off twinkling stars" in the sky.
"Nature's Magnificence" by Tyra Smith August 2000
Finished Size 5.5 x 8.5 inches (half sheet)
Images: Stampscapes®: 213G Autumn Bank Left, 214G Autumn Bank Right, 181G Cracked Earth, 018E Cloud Cumulus, 020E Cloud w/Lightning, 068D Reeds Large, 026B Ducks in Water Large, 162A Solo Duck
Materials: King James Cast Cote 10 Point (White), Stipple brushes, Pentel Metallic Pen/Silver, Pentel Milky Gel Pen/White
Colour: HALOS dye ink pads, Marvy Matchables dye ink pads, Printworks Dye Ink pads.