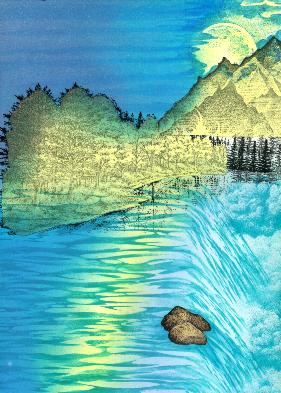
Mystic Falls
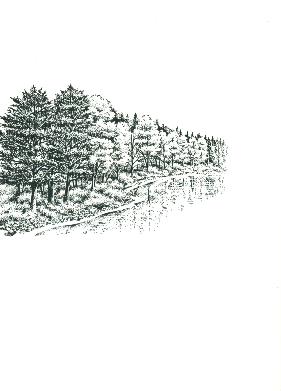
Autumn Bank Left 213G is stamped on the upper left side using Ranger Archival Jet Black. Make sure image is dry before proceeding.

Fir Row 243A is stamped with Ranger Archival Jet Black to the right of the Autumn Bank Left 213G, filling out the landmass. Mask Autumn Bank Left 213G. Fog, Cliffs & Waves 257F is stamped with Ranger Archival Jet Black on the right side just over the tops of the Fir Row 243A. To achieve a lighter hue in the mountains, first stamp off on scrap paper and then stamp on the cardstock without reinking the stamp.
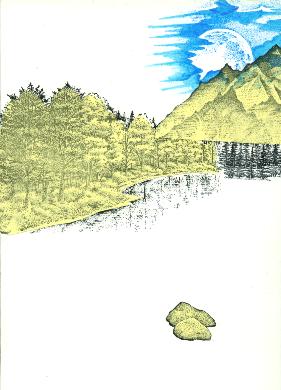
Rock Duo 131A is stamped with Ranger Archival Jet Black in the lower water area. When the ink is dry, mask Rock Duo 131A and Fog, Cliffs & Waves 257F. Cloud Rising Moon 197E is stamped with Ranger Sea Brights Sail Boat Blue just above the masked mountains. While the ink is still wet, use a Ranger Cut 'n Dry Nib to pull the ink outwards from the moon and smooth the ink as desired. Occasionally wipe the nib on a paper towel to pull off the ink absorbed from the cardstock. Once your moon looks the way you want it to, lay a paper towel over the still-wet ink and gently press to remove excess ink left on the cardstock. You may want to practice the moon on a few pieces of scrap glossy cardstock to get the hang of how it works.
Mystical Waters 255G is stamped with Ranger Stamp-It Jamestown Blue on the left 2/3's of the water area. While the ink is still wet, use your finger to "smear" the ink off the right edge at an angle to create the impression of water falling over a cliff. Rub your finger over the stamped lines in the water to soften them. Be sure to rub the ink off your finger each time you smear a line, this way you won't carry extra ink from your finger to other areas of the water. You may want to practice this on a scrap of glossy white cardstock.
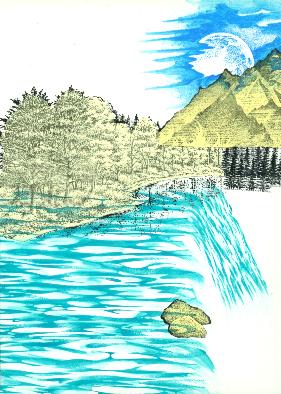
To create the "falling water" portion of the waterfall, place a soft mask (I used a piece of scrap paper) over the "river" area and stamp Water Pattern Small 231C with Ranger Stamp-It Jamestown Blue at an angle to the river. Remove mask and while ink is still wet, smear the lines up into the river and also down towards the bottom of the falls.
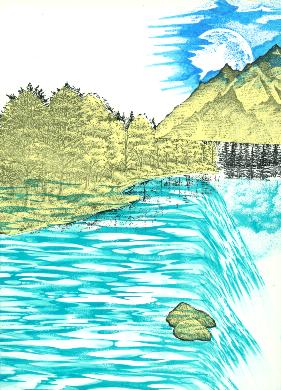
Finish off the "falling water" portion of the waterfall as stated above, one stamped image at a time with the Water Pattern Small 231C and Ranger Stamp-It Jamestown Blue ink. Now...to "fluff up" the waterfall area and give the impression of water misted into the air, Cloud Cumulus 018E is stamped by inking up the image with Ranger Stamp-It Jamestown Blue, lightly dab edges of inked stamp with paper towel to soften edges, stamp off on scrap paper and stamp on the cardstock without reinking.

Complete right side of waterfall area by inking up Cumulus Cloud 018E with Ranger Stamp-It Jamestown Blue, dab edges of inked stamp with paper towel to soften edges, stamp off on scrap paper, then stamped below the first cloud slightly and then stamped below that cloud once again without reinking stamp.
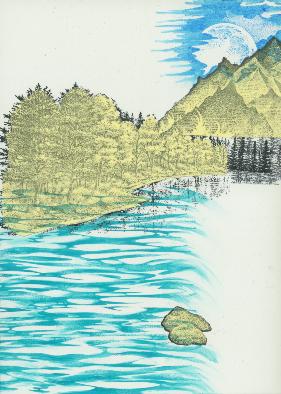
Stipple Ranger Stamp-It Yellow over the moon and also at a diagonal across the surface of the water in the river area. This will act as a visual cue within the scene.
Ranger Stamp-It Periwinkle is stamped over water area, slightly overlapping on both sides of the yellow reflection. Keep in mind that because the light source/moon is in the upper right corner of the piece, the left side will be darker than the right side with the lower left corner being the darkest.
Ranger Stamp-It Light Blue is stippled over the river portion (not the falling water area) to the left and right of the yellow reflection. Ranger Stamp-It Jamestown Blue is stippled on the left side of the yellow refection. Ranger Sea Brights Sail Boat Blue is stippled against the far left side of the river. This should create a river that is darkest on the left side, lighter towards the yellow reflection and lightest on the right side of the yellow reflection and "falling water area."
Using a Ranger Cut 'n Dry Nib, brush Ranger Stamp-It Yellow over the areas of the rocks in the water that will be light. Brush Ranger Adirondack Espresso over the rocks and lightly into the yellow highlights. Ranger Sea Brights Sail Boat Blue is brushed around the rocks and slightly down into the falling water area to give the impression of water rushing around the rocks and down the falls. Using a round orange craft sponge, tap the sponge on the inkpad and draw the ink across the sky area. Using one color at time, use the sponge to get a nice, full coverage of ink in the sky. Each color is applied on top of the previous color to darken the sky. The sky is completed using four colors of blue in this order: Ranger Stamp-It Periwinkle, Light Blue, Jamestown Blue and Ranger Sea Brights Sail Boat Blue. The final color, Ranger Sea Brights Watermelon Red, is sponged from the left side of the sky in towards the moon by dragging the sponge lightly across the sky. The left side of the sky will be darker than the right side where the light source is. The sky looks quite nice "as is", but we can also do a bit more to add some color in the night sky. We will now add a bit of visual interest to sky using a wedge type make-up sponge and the dye inks. Use on the very thin edge of the make-up sponge. Using Ranger Sea Brights Sail Boat Blue, ink up the edge of the make-up sponge and then "drag" it across the sky area starting with the whispy edge of the cloud around the moon and pulling the sponge horizontally to the left across the sky.

Use the edge of the make-up sponge and apply Ranger Sea Brights Purple Surf, pulling the sponge from the right across the sky to the left just under the blue lines you created in step 11. Finally, repeat this process using Ranger Sea Brights Watermelon Red under the Purple Surf.
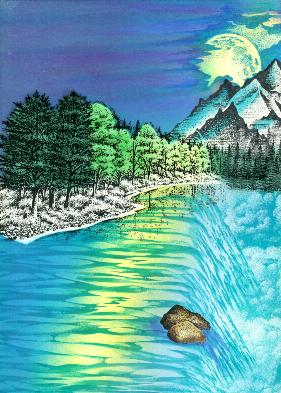
Remove all masks. Using a make-up sponge and Ranger Stamp-It Jamestown Blue, pull a little blue onto the peaks of the mountains. Stipple Ranger Stamp-It Yellow over the trees where you feel the moonlight might touch them. Stipple Ranger Adirondack Bottle over the Evergreen Trees along the upper bank and stipple Ranger Stamp-It Green over the non-evergreen type trees.
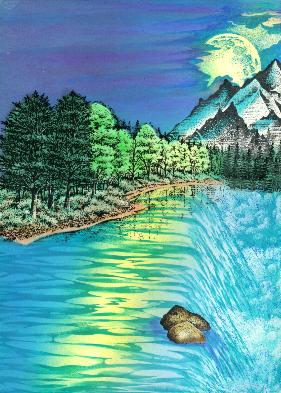
Stipple Ranger Stamp-It Brown over the ground area along the upper bank. On top of the brown, stipple Ranger Sea Brights Awning Green. Using a Cut 'n Dry Nib and Ranger Sea Brights Awning Green, go over some of the more shadowed places of the grass area on the upper bank. Using a Cut 'n Dry Nib, brush Ranger Stamp-It Brown over the beach area of the upper bank where there isn't any grass. Splash 132B is stamped Ranger Sea Brights Sail Boat Blue over the clouds on the right side of the falling water area.
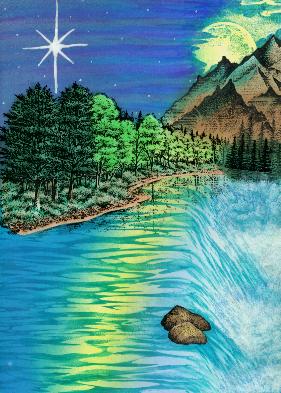
Ranger Adirondack Mushroom is stippled over the mountains. Using a Q-tip, lightly "dab" Brilliance Moonlight White ink over the mist area of the falls along the right side of the scene. This will dry. Once dry, use the same q-tip and lightly dab Iridescent Tinting medium on the same area for visual interest. Using a white gel pen, draw a star in the upper left portion of the sky. Sign your work.
"Mystic Falls" by Tyra Smith 2002
Images: Stampscapes: 255G Mystical Waters, 213G Autumn Bank Left, 257F Fog, Cliffs & Waves, 197E Cloud Rising Moon, 018E Cloud Cumulus, 231C Water Pattern Small, 132B Splash, 243A Fir Row, 131A Rock Duo Small
Materials: King James Cast Cote 10 Point White Glossy Cardstock, Post-it Notes, Exacto Knife, Ranger Cut 'n Dry Nibs, Round Orange Craft Sponge, Wedge Type Foam Make-up Sponges, Q-tips, Iridescent Tinting Medium, White Gel Pen
Colour:
Ranger Archival Inks: Jet Black
Ranger Adirondack Inks: Espresso, Bottle, Mushroom
Ranger Sea Brights Inks: Sail Boat Blue, Purple Surf, Watermelon Red, Awning Green
Ranger Stamp-It Inks: Jamestown Blue, Light Blue, Periwinkle, Yellow, Brown
Green Brilliance Inks: Moonlight White