Faux Paper Cast Loon

To create the cast, acrylic templates are taped one on top of another. Scotch Poster tape (a double sided low tack tape) is perfect for this, but you can also use masking tape. If using masking tape, tear off a piece and fold it back onto itself so that you have "tack" on both sides. The templates used in this project were purchased from Evolving Images (http://www.evolving-images.com/) but you could also use any type of wooden craft shapes available in most all craft type stores. If using wooden craft shapes, spray it with a spray sealant and allow it to dry prior to working this project. Tape all the templates on top of each other and then set it on top of a sturdy surface (an aluminum foil covered clip board was used in this project).
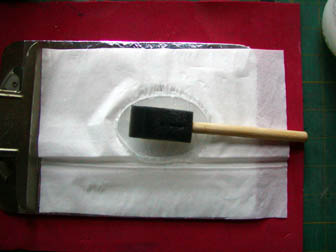
In a container thoroughly mix equal parts of liquid starch and water. Lay a kleenex (two-ply) on top of the stacked templates. Using a foam brush, begin to gently "dab" the liquid starch mixture on top, starting at the top center and working outwards. Toilet paper can also be used in place of the kleenex, use the cheapest two-ply toilet paper you can find.
Continue dabbing the liquid starch mixture on top of the dry kleenex, working down to the second level of the stacked templates. Go slowly, as too much "scrubbing or dabbing" on the thin kleenex may tear it. If it tears, smooth it gently as much as you can and continue on.
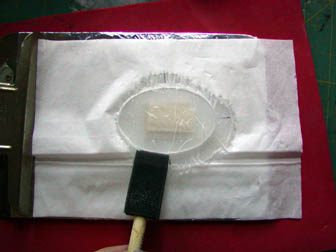
Continue dabbing the liquid starch mixture on the next level of the stacked templates. Also be sure to dab the liquid starch mixture over the final edges of the templates and on top of the clip board a bit. You will get ripples and this is just fine as it adds a beautiful texture to the finished paper casting piece. use a heat gun to air dry the piece as best you can. You are finished with the first layer of kleenex.
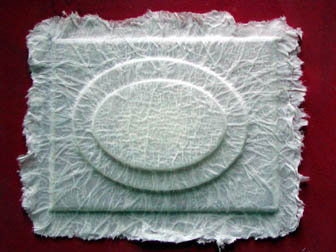
Repeat steps 2-4 until you have 5 layers of tissue paper. While it is still wet, tear off excess tissue paper, leaving a good margin of it around the edges.
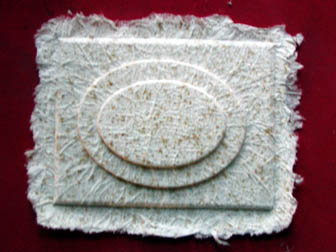
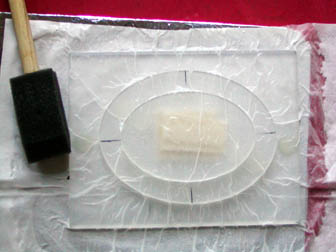
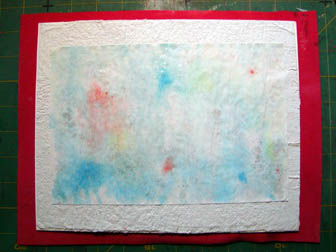
In a fine mist spray bottle, mix in equal parts walnut ink and water. LIGHTLY spritz the wet paper casting piece with the walnut ink to create a soft speckled look. Use a heat gun to lightly dry the surface of the paper casting piece and set aside to dry over night. Do NOT remove the paper casting piece from the stacked acrylic templates yet.
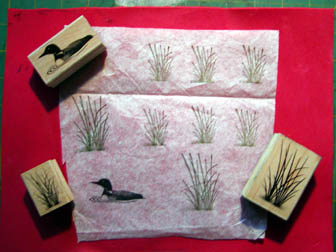
Using a permanent ink (Staz-On or Ranger 213), stamp Loon 260C in black and Reeds 067B and Reeds Large 0-68D in Green. Let dry.
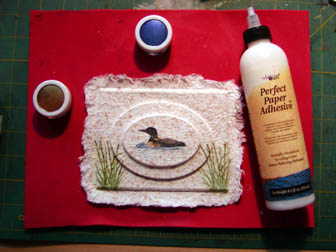
Trim around the stamped images on the tissue paper, leaving a small blank edge (about 1/8 inch or so). Brush Perfect Paper Adhesive (matte) over the top center oval of the paper casting piece, press the tissue paper Loon 260C on top of the wet Perfect Paper Adhesive. Dip your brush in the Perfect Paper Adhesive and brush it over the tissue paper Loon 260C. Start in the center and brush outwards towards the edges to remove any little air bubbles. Do not press down hard with the brush, use gentle pressure. The tissue paper should "disappear" and leave you with only the stamped image. While the Perfect Paper Adhesive is still wet on the paper casting piece, take your brush and dip it into the Perfect Paper Adhesive, dip the wet brush lightly into Perfect Pearls Kiwi and brush this over the light areas of the loon's body. Clean your brush. Dip your brush into the Perfect Paper Adhesive, dip the wet brush lightly into the Perfect Pearls Forever Blue and brush it over the wave lines beneath the loon's body. Repeat this process with the Reeds Large 068D stamped tissue paper image on both the bottom left and bottom right sides of the paper casting piece. There was not any color added to the reed area using Perfect Pearls. Note: if the Perfect Paper Adhesive is a bit thick straight out of the bottle and will not brush on easily, thin it with a TINY bit of water.
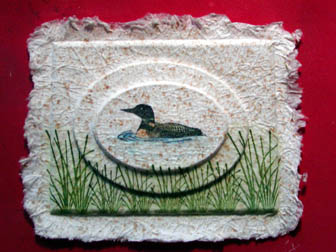
Fill in the open bottom reed area of the paper casting piece with the Reeds 067B stamped in Green on tissue paper. Adhere the tissue paper pieces the same way you adhered the Loon 260C and Reeds Large 068D tissue paper pieces above.
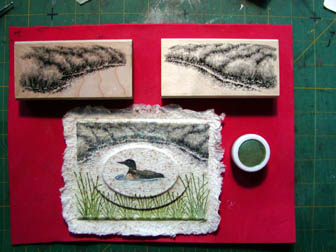
Stamp Sedge Bank Left 234F and Sedge Bank Right 233F on tissue paper with permanent black ink. Trim stamped images and affix to the upper portion of the paper casting piece with Perfect Paper Adhesive the same way you did with the other stamped tissue paper images. Trim away any part of the stamped images that is too long for the paper casting piece. In a palette, mix Perfect Pearls Kiwi with Perfect Paper Adhesive and brush over the "ground" area of the Sedge Banks. Let dry.
Cut a piece of matteboard to an 8 x 10 inch size. Adhere specialty papers of choice (or hand-made backgrounds) to the matteboard with an appropriate adhesive. (Yes! Glue was used in this project piece) Set aside to dry.
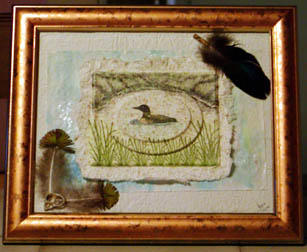
Remove the dry paper casting piece from by gently pulling it off the acrylic templates. Cut foam mounting tape into square pieces and press the squares to the back of the paper casting piece. The foam mounting tape squares are pressed just on the inside of the rectangle shape, leaving the "frayed edges" to lie "as is". Center paper casting piece on matteboard and adhere. Embellish as desired, peacock feathers were used for this finished project. Discard glass in frame (you won't use it with this piece), slip finished matteboard into the frame and secure it.
"Faux Paper Cast Loon" by Tyra Smith 2002
Images: Stampscapes: 067B Reeds, 260C Loon, 068D Reeds Large, 233F Sedge Bank Right, 234F Sedge Bank Left
Materials: Solid acrylic (or wood) templates, liquid starch, kleenex, small foam brush, heat gun, fine mist spray bottle, low tack double sided poster tape (or masking tape), uncoated tissue paper, paintbrushes, Perfect Paper Adhesive (matte), matteboard, specialty papers (or hand-made background papers), 8 x 10 inch frame, foam mounting tape, peacock feathers, beads, shells, Crafter's Pick glue.
Colour:
Staz-On Jet Black, Olive Green
Perfect Pearls - Kiwi and Forever Blue
Walnut Ink