Deer Country
NOTE 1: Please read through the Basic Stipple Brush Technique instructions prior to reading the lesson.
NOTE 2: All inks used for stippling and stamping are dye inks unless otherwise noted. Brand is not as important as color, so brand names have been left out.
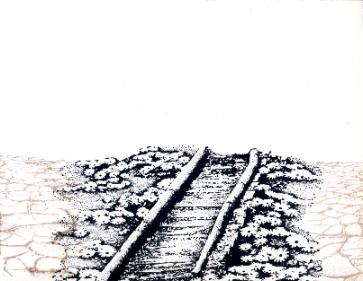
Blooms & Bridge 221G is stamped with black. Cracked Earth 180E is stamped with light brown on both sides of the bridge. Be sure to stamp off the Cracked Earth 180E on scrap paper prior to stamping on your card stock so it will be light when stamped. The cracked earth image is meant to indicate a shallow stream bed rather than a defined dried earth area.
Tree Truck Trio 088F and Tree Trunk 087F are stamped in black. Before stamping on the cardstock, use a piece of paper towel to lift off some of the ink at the base of each tree trunk prior to stamping it on your card stock. This helps the tree trunks to blend more smoothly with the stream bank.
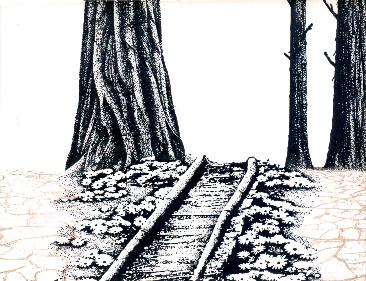
Mask tree trunks. Pine 196F is stamped with black. Pine Row 150E is stamped with black along the entire length of the top of the card stock. The Pine Row will help to define your meadow area. Do not remove masks.
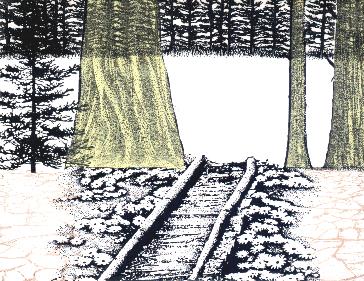
Stipple yellow along the tree line a the back of the meadow. Stipple light brown over the ground area, then stipple light green on top of the brown. Allow the stippling of the ground cover to appear splotchy which adds to the texture of the ground cover. Grass Texture 208D is stamped in olive over the ground cover of the meadow.
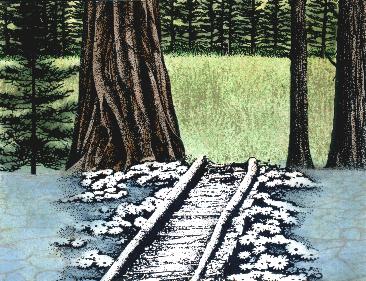
Stipple dark green over all the pine trees. Wish a small brush, apply light green to the grass blades of the Pine Row images. Remove masks. Stipple light blue over the water area, followed by olive and then medium blue. Stipple light brown over the tree trunks. Texture the largest tree trunk using a small brush and medium brown, apply the medium brown to the shaded areas of the tree trunk as indicated by the stamp image itself.

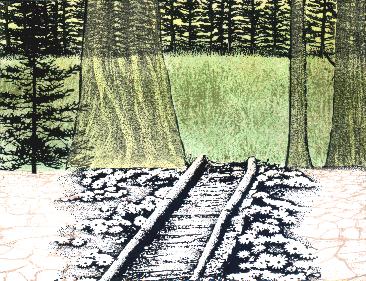
Stipple light brown over the bridge, then stipple gray on top of the brown. The gray will smooth the appearance of the bridge, blending the brown. Using a small brush, apply the light brown to the darker areas of the bridge as indicated by the stamp image itself. With the small brush, apply red, yellow and purple to the flowers on both sides of the bridge.
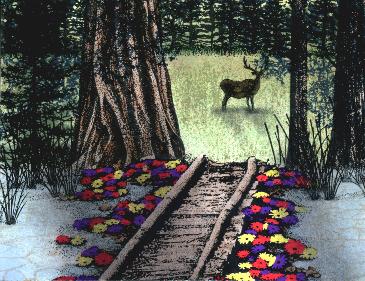
To add visual interest, create shadows that come from the trees a the edge of the stream across the water and bridge at a diagonal from upper left to lower right. Start stippling gray at the base of the tree trunk and stipple it diagonally to right. Do this for all trees along the stream bank. If your shadows are not dark enough, stipple black on top of the gray. You also need to create shadows that are formed by the trees at the back of the meadow. Stipple light brown starting at the base of the trees at the back of the meadow and down into the meadow a bit. Next, stipple gray over the area you just stippled brown for the shadow. The gray will smooth and blend the shadows into the ground coverage of the meadow.
Reeds 067B is stamped in black along the upper stream bank in order to more clearly define the upper bank of the stream.
Buck Large 009B is stamped in black and the buck's shadow is stipple in the same direction as the trees with gray.
"Deer Country" By Tyra Smith, September 2000
Finished Size: 4.25 x 5.50 inches
Images: Stampscapes®: 203G Oak Branch Large, 221G Blooms & Bridge, 087F Tree Trunk, 088F Tree Trunk Trio, 196F Pine, 150E Pine Row, 180E Cracked Earth, 208D Grass Texture, 009B Buck Large, 067B Reeds
Materials: King James Cast Cote 10 Point (White), Stipple brushes
Colour: HALOS dye ink pads, Marvy Matchables dye ink pads, Printworks Dye Ink pads.