Fisherman's Haven
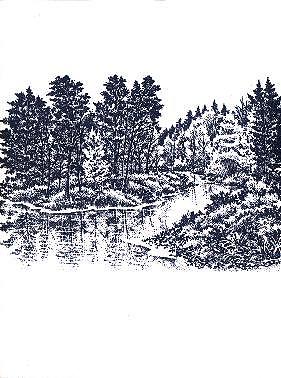
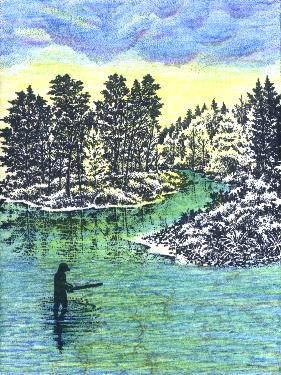
Autumn Brook 212G is stamped with Ranger Archival Jet Black ink on matte white card stock.
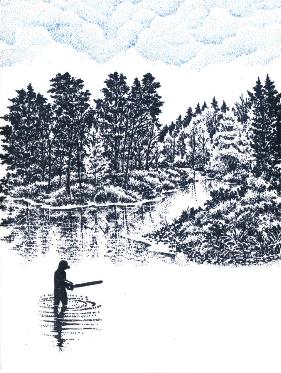
Cloud Bar 119F is stamped across the top with light blue dye ink. Prior to stamping on the card stock, gently dab bottom edges of stamp with a paper towel to remove ink from the dotted areas at the bottom of the cloud bar.Wading Fisherman 186B is stamped in the lower left corner with Ranger Archival Jet Black ink. The placement of the Wading Fisherman is important as it initiates the diagonal that will direct the viewerís line of sight.
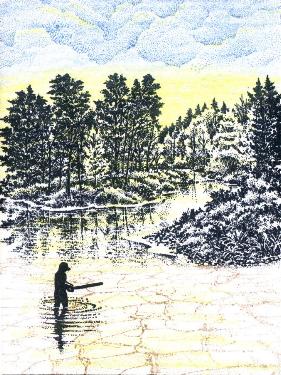
Cracked Earth 181G is stamped with light blue dye ink first on scrap paper, then on card stock without re-inking. This gives a subdued light brown earth appearance for a shallow water area.
Using a yellow pencil and light pressure, color the sky area just below the cloud bar, down over the trees and into the water area to indicate a reflection of the light source on the water.
Using a light blue pencil and light pressure, color the sky starting at the top and working downwards. Slightly overlap the light blue onto the yellow of the sky.
Using a light yellow pencil (or colorless blender pencil) and moderate pressure, color over the yellow again and slightly up into the blue of the sky underneath the cloud bar. This should blend the yellow portion of the sky for you.
Note 1: They key to achieving a sense of depth with colored pencils is to use multiple layers of color.
Note 2: To achieve different hues of the same color, alter the amount of pressure you use while coloring with the pencils. Light pressure will give you a light hue, moderate pressure will give you a medium range hue, etcÖ
Note 3: To blend colored pencil work, a colorless blender pencil works wonderfully. In the absence of the colorless blender pencil, use a very light colored pencil. For instance, if your sky has three shades of blue in it, use the lightest shade of blue with moderate pressure to blend the entire sky area once you add in all your colors.
Using a medium blue pencil and light pressure, color over the cloud bar area. Add some yellow in the areas of the clouds that are to be lightest. Accentuate the bottom curves of the clouds in the cloud bar by coloring first with light purple/lavender pencil, then a light pink pencil just above the light purple/lavender. The pink and purple will add visual interest to the clouds. Using a dark blue pencil and light pressure, color only the areas of the clouds in the cloud bar that will be darkest. Blend the colors using a colorless blender pencil (or very light blue pencil). You will now notice that most of the stamped image of the cloud bar is covered up with colored pencils.
To bring more definition back into the clouds, Cloud Bar 119F is stamped with medium blue dye ink on top of the clouds you just finished coloring with the pencils.
In the water area, color lightly with a light green pencil. Do not try for a full coverage of green in the water area; rather streak the green throughout the water area. Using a medium blue pencil and light pressure, fully color the entire water area. Use a dark blue pencil to streak darker blue throughout the water area. Blend colors with a colorless blender pencil (or very light blue pencil). To add the illusion of movement to the water, Water Pattern 092E was stamped with medium blue (after first stamping off on scrap paper) along the bottom portion of the water area. The water pattern marks from the stamp will not be extremely evident. They will be quite light, almost as if they are ghost marks. Darken the shadow of the wading fisherman with a dark blue pencil and moderate pressure. Much of the reflection of the sky has been lost in the water now. Use a yellow pencil and color the yellow into the water again to bring out the idea of a reflected light source.
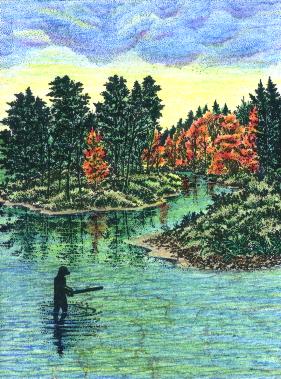
Ground Cover: Using a light brown pencil and light pressure, color over the ground area and sand along the shoreline. Using a light green pencil and light pressure, color over the grassy area of the ground. Using a light gray pencil and moderate pressure, color over the sand area of the shoreline only. This will smooth and blend the sand area. Using a medium green pencil and moderate pressure, color over the darker areas of the grass. This helps to shade and reinforce the shape of the ground itself. Using a medium green pencil and heavy pressure, mark over the plant leaves in the foreground of the ground areas.
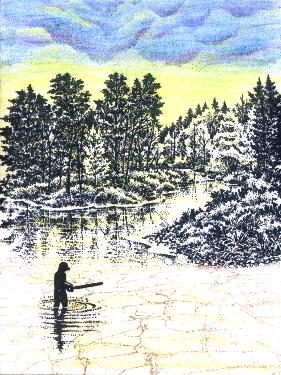
Trees: Use red, orange and light brown pencils to add fall color to the oak trees. Using a yellow pencil and moderate pressure, go over the colors of the oak trees to smooth and blend the colors. At this time, also use red and orange pencils with moderate pressure to color over the oak tree reflections in the water. Using a medium green pencil, lightly color over the pine trees. Using a dark green pencil, lightly color over the pine trees again, then use moderate to heavy pressure to darken the darker areas of the pine trees. Use the dark green pencil and moderate to heavy pressure to color over the reflections of the pine trees in the water. Because this is a day scene, the water is more apt to reflect the true colors of the trees. Had it been a night scene, darker shades of blue would have been used to color over the reflections of all the trees in the water because at night, the water is less apt to reflect the true colors of the trees.
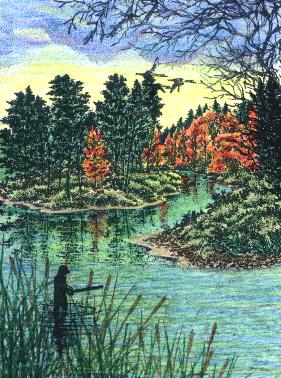
To complete the scene, we need to finish the directional cue we started when we began the diagonal by stamping the Wading Fisherman 186B in the lower left corner.
Cattails Large 017D is stamped with brown dye ink along the bottom left portion of the water. Reeds Large 068D is stamped first with green dye ink, and then with dark green dye ink on top of the cattails stamped in brown.
Crooked Limb 097E is stamped first with black dye ink in the upper right corner of the sky, which surprisingly dried a gray color. The crooked limb was then stamp again with Ranger Archival Jet Black ink on top of the previously stamped crooked limb. The image stamped with Ranger Archival Jet Black ink stayed a nice crisp black. The lighter gray crooked limb beneath the black one is nice for an unexpected shading effect.
Duck Trio in Flight 023A is stamped with Ranger Archival Jet Black ink midway between the crooked limbs in the upper right corner and the reeds and cattails in the lower left corner. The direction is now complete and the piece is finished.
"Fisherman's Haven" by Tyra Smith, September 2000
Finished Size: 4.25" x 5.50" inches
Images: Stampscapes®: 181G Cracked Earth, 212G Autumn Brook, 119F Cloud Bar, 092E Water Pattern, 097E Crooked Limb, 017D Cattails Large, 068D Reeds Large, 186B Wading Fisherman, 023A Duck Trio in Flight
Materials: Beckett Expressions 80# Card stock/Iceberg, Berol Colorless Blender Pencil
Colour: Berol Prismacolor Colored Pencils, Ranger Archival ink pads, Marvy Matchable dye ink pads, HALOS dye ink pads